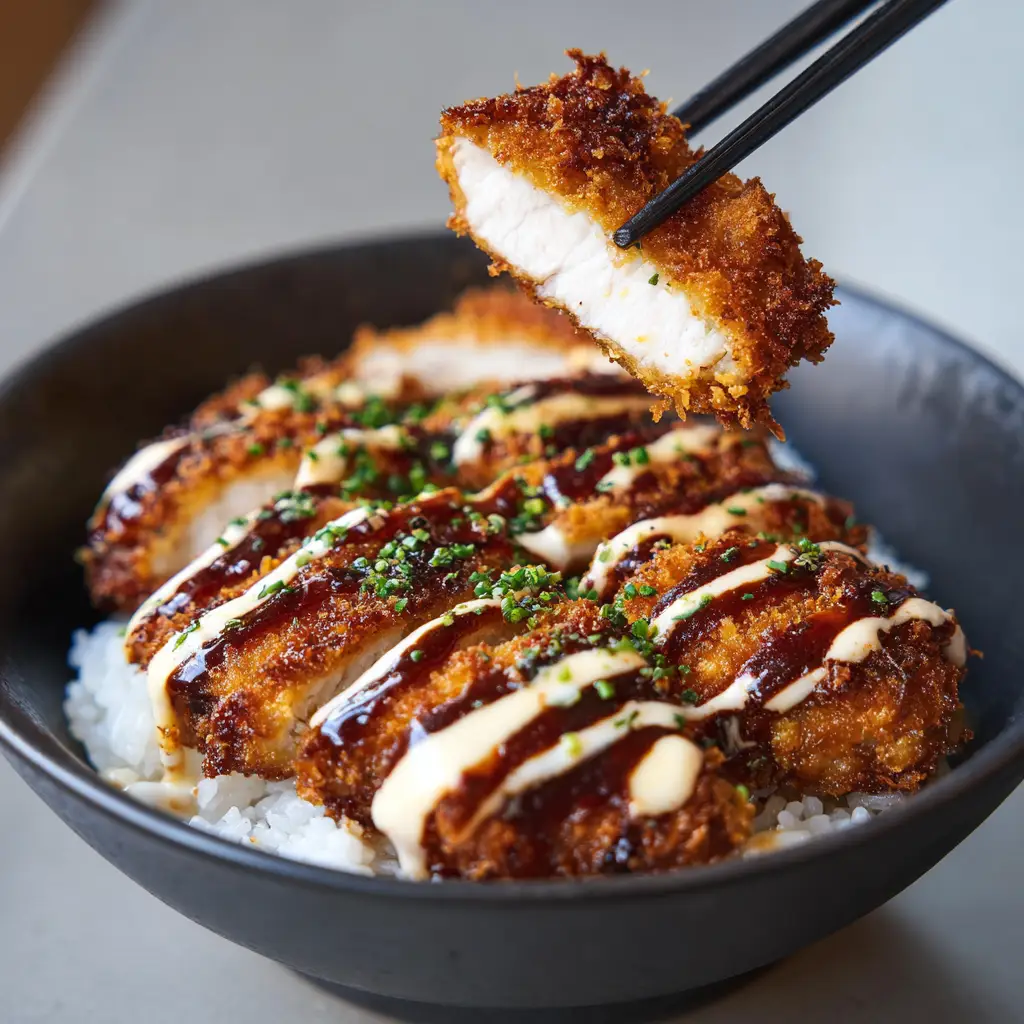
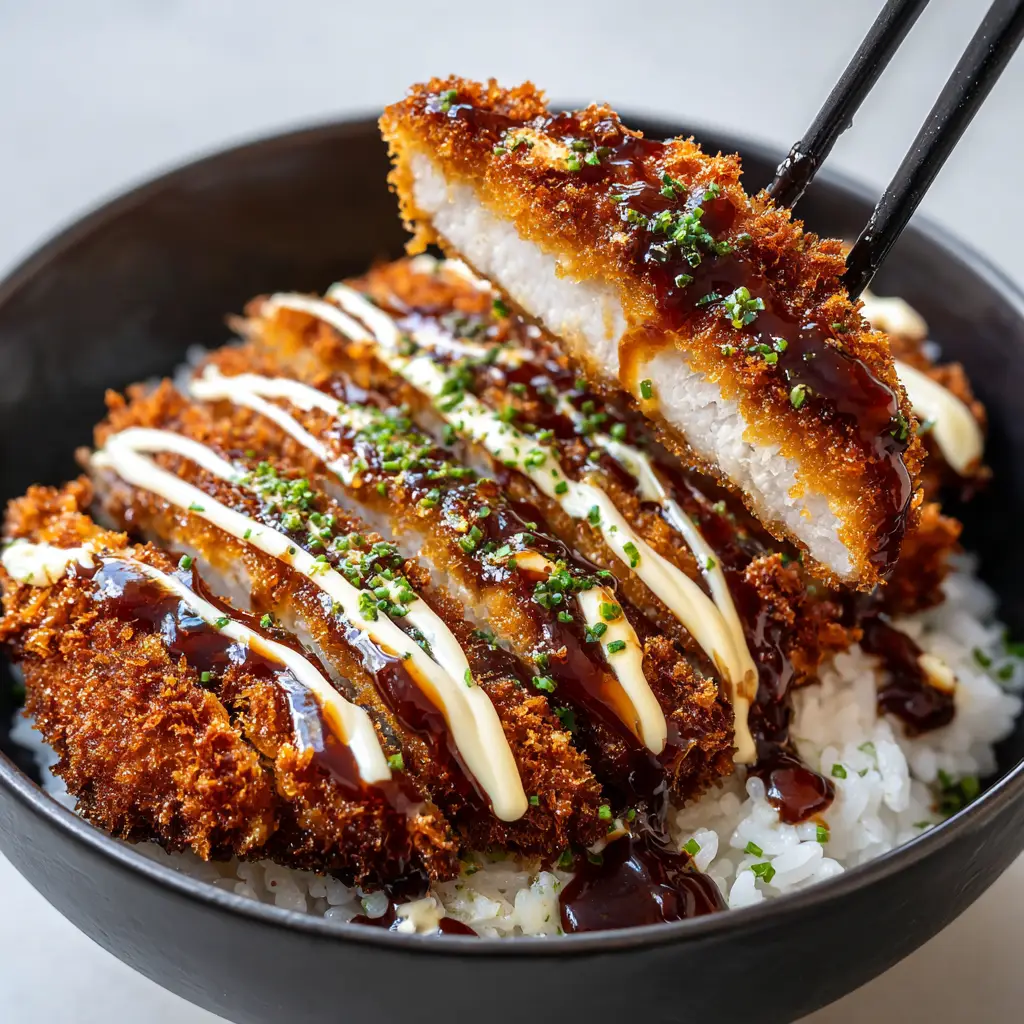
There is something undeniably hypnotic about a Japanese Katsu Bowl. Imagine a deep golden-brown, panko-breaded chicken cutlet that crackles with every bite, revealing a steaming, juicy white meat interior. When you nestle that crispy masterpiece onto a bed of fluffy, cloud-like white rice and drizzle it with a duo of savory and creamy sauces, you aren’t just making dinner; you are crafting a sensory experience.
This Japanese Katsu Bowl is designed to replicate the high-end aesthetic of a Tokyo bistro right in your own kitchen. Whether you are looking for a comforting weeknight meal or a show-stopping dish to impress guests, this recipe delivers on every front. From the glossy, dark tonkatsu sauce to the artistic zig-zag of creamy beige aioli, every element is balanced for flavor, texture, and visual perfection.
If you have been searching for that “restaurant-quality” crunch that stays crispy even under a blanket of sauce, you have come to the right place. We are going to dive deep into the culinary science of the perfect fry, the art of the drizzle, and how to achieve that professional matte black bowl presentation seen in the world’s finest food photography.
Why This Japanese Katsu Bowl Recipe Will Change Your Dinner Game
- Unrivaled Texture: We use a specific double-dredge technique to ensure the panko crust is thick, highly detailed, and exceptionally crunchy.
- The Perfect Drizzle: The contrast between the dark, acidic tonkatsu sauce and the creamy, light-beige aioli creates a flavor profile that hits every part of your palate.
- Visual Mastery: This dish is designed to look as good as it tastes, featuring vibrant green chives and a professional “zig-zag” sauce application.
- Scientifically Juicy: By controlling the oil temperature and resting the meat, we guarantee the chicken remains succulent and tender inside its golden shell.
Essential Components for Your Gourmet Katsu Experience
To achieve the result of a professional Japanese Katsu Bowl, every ingredient must serve a specific culinary purpose. We don’t just use “chicken”; we use chicken prepared with precision to ensure it fits perfectly into that matte black ceramic bowl.
Boneless Skinless Chicken Breasts or Thighs: 1.5 lbs (680g). Breasts provide that clean, white meat look seen in professional photography, while thighs offer a slightly richer flavor. Both must be pounded to an even thickness for uniform frying.
Panko Breadcrumbs: 2 cups (120g). Unlike standard breadcrumbs, panko flakes are larger and airier, creating the highly detailed, craggy texture that defines a true katsu.
Short-Grain White Rice: 2 cups (400g) dry. Also known as sushi rice, this variety has the starch content required to be “fluffy” yet slightly sticky, providing the perfect foundation for the heavy cutlet.
Tonkatsu Sauce: 1/2 cup (120ml). This thick, glossy, dark brown sauce provides the essential umami and tang that cuts through the richness of the fried chicken.
Creamy Beige Aioli: 1/4 cup (60ml). A mixture of Japanese mayo, garlic, and a hint of lemon creates the light-beige contrast that makes the dish pop visually.
Fresh Chives: 2 tbsp (6g). Finely chopped chives add a necessary hit of onion-like brightness and a beautiful green garnish to the final presentation.
Neutral Frying Oil: 3 cups (710ml). Using an oil with a high smoke point, like canola or vegetable oil, ensures a clean flavor and a deep golden-brown finish without burning.
All-Purpose Flour & Large Eggs: 1/2 cup (60g) flour and 2 eggs. These act as the “glue,” ensuring the panko stays attached to the chicken through the intense heat of the deep fry.
Must-Have Kitchen Tools for a Professional Result
To get the chicken sliced into those thick, perfect strips shown in the visuals, you need more than just a standard knife. Achieving the “handheld smartphone photo” look requires a few specific tools to manage heat and texture.
A heavy-bottomed Dutch oven or deep skillet is essential for maintaining a steady oil temperature. You will also need a wire cooling rack; placing the fried katsu on paper towels can make the bottom soggy, whereas a rack allows air to circulate, keeping the panko crisp on all sides.
For the sauce application, small squeeze bottles are the “secret weapon” for achieving that artful zig-zag pattern. Finally, a sharp Chef’s knife is non-negotiable for slicing the cutlet without shattering the delicate panko crust. If you enjoy precision in the kitchen, you might also find success with a sharp blade for delicate prep work.
Step-by-Step Mastery: Crafting the Perfect Japanese Katsu Bowl
The Foundation: Preparing the Fluffy White Rice
Start by rinsing your 2 cups (400g) of short-grain rice under cold water until the water runs clear. This removes excess surface starch, preventing the rice from becoming gummy. Combine with 2.5 cups (600ml) of water in a pot or rice cooker and cook until the grains are tender and fluffy.
Once cooked, let the rice stand for 10 minutes with the lid on. This allows the moisture to redistribute, creating that perfect “bed” for our chicken. If you enjoy varied rice textures, you might also like the citrus notes in other grain-based creations.
The Prep: Pounding and Dredging the Chicken
Place your chicken between two sheets of plastic wrap. Using a meat mallet, pound the chicken to a consistent 1/2-inch (1.25cm) thickness. This ensures the chicken cooks through at the exact moment the crust reaches that deep golden-brown color.
Set up your dredging station: one bowl with flour, salt, and pepper; one with beaten eggs; and one with the panko. Coat the chicken in flour, dip in the egg, and then press firmly into the panko. Ensure every nook and cranny is covered in those jagged breadcrumbs for maximum visual detail.
The Fry: Achieving the Deep Golden-Brown Crust
Heat your neutral oil to 350°F (175°C). Carefully lower the breaded chicken into the oil. Listen for a vigorous sizzle—this is the sound of moisture escaping and the crust sealing. Fry for 3-4 minutes per side until the exterior is a rich, deep golden-brown.
Use a thermometer to ensure the internal meat temperature reaches 165°F (74°C). When you lift the katsu out, it should feel light and the crust should be rigid. Rest the chicken on a wire rack for 5 minutes before slicing; this prevents the juices from running out and keeps the meat white and moist.
The Assembly: The Art of the Zig-Zag Drizzle
Scoop a generous portion of rice into a matte black ceramic bowl. Slice the chicken cutlet into thick, even strips and fan them out across the rice. Now, for the signature look: take your glossy tonkatsu sauce and drizzle it in a tight zig-zag pattern over the chicken.
Follow up with the light-beige aioli, crossing over the tonkatsu sauce for a beautiful lattice effect. Finish with a shower of finely chopped fresh chives. When you lift a slice with your black chopsticks, you should see that juicy white interior contrasting against the dark, crispy exterior.
Expert Tips for a Flawless Japanese Katsu Bowl
- Oil Temperature is King: If the oil is too cool, the panko will absorb grease and become heavy. If it’s too hot, the outside will burn before the chicken is cooked. Use a clip-on thermometer for precision.
- Double Flour Method: For an even thicker crust, some chefs prefer a light dusting of flour, then egg, then a tiny bit more flour before the final egg and panko dip.
- Rest the Rice: Never skip the resting phase for the rice. It’s the difference between a soggy base and a fluffy, professional foundation.
- The Chopstick Test: To ensure your katsu is perfectly cooked, look for the “juicy white meat interior” as you lift a slice. It should be glistening, not dry.
What to Pair with Your Katsu Bowl
While this Japanese Katsu Bowl is a complete meal on its own, it pairs beautifully with other textures and flavors. A simple side of shredded cabbage with a sesame dressing is traditional and provides a refreshing crunch.
If you’re looking for more Asian-inspired dishes to fill out your weekly menu, try this high-protein egg roll in a bowl for a lighter alternative. For a more fusion-style dinner, you might even consider serving the katsu alongside shrimp and cabbage stir fry. And for dessert? Something rich like a no-bake chocolate eclair cake is the perfect way to end the meal.
Storage and Reheating Secrets
Leftover katsu is a treat, but it can lose its crunch. Store the chicken and rice in separate airtight containers in the refrigerator for up to 3 days. To reheat, avoid the microwave as it will make the panko soggy.
Instead, place the chicken in an air fryer at 350°F (175°C) for 3-5 minutes, or in a toaster oven. This will revitalize the panko’s deep golden-brown crispiness. Reheat the rice with a splash of water in the microwave to restore its fluffiness.
Frequently Asked Questions
Yes, though you won’t get the same deep golden-brown color. Spritz the panko liberally with oil and air fry at 400°F (200°C) for 12-15 minutes, turning halfway.
Ensure the chicken is dry before flouring, and firmly press the panko into the egg-washed chicken to create a strong bond.
Traditional tonkatsu sauce is a thick, umami-rich blend of ketchup, Worcestershire sauce, soy sauce, and sugar, providing a tangy contrast to fried meat.
The primary difference is the use of panko breadcrumbs, which are larger and airier than standard crumbs, resulting in a distinctively spiky, crispy texture.
Short-grain white rice, often labeled as sushi rice, is best because its sticky texture holds up well under the weight of the chicken and sauce.
The Ultimate Japanese Katsu Bowl Recipe
Japanese Katsu Bowl: The Secret to the Ultimate Crispy Chicken and Rice
Ingredients
Equipment
Instructions
- Rinse rice until water runs clear. Combine with water in a pot, bring to boil, then simmer covered for 15 minutes. Let rest for 10 minutes.
- Pound chicken breasts to 1/2-inch thickness. Season with salt and pepper. Dredge in flour, dip in beaten eggs, and coat thoroughly with panko crumbs.
- Heat oil to 350°F (175°C). Fry chicken for 3-4 minutes per side until deep golden-brown. Rest on a wire rack for 5 minutes.
- Slice chicken into thick strips. Place over a bed of rice in a matte black bowl. Drizzle tonkatsu sauce and aioli in a zig-zag pattern. Garnish with chives.
Notes
Always rest the chicken on a wire rack, never directly on paper towels, to prevent a soggy bottom.
Master the Art of the Japanese Katsu Bowl
The Japanese Katsu Bowl is more than just a meal; it is a testament to how simple ingredients like chicken and rice can be elevated through technique. By focusing on the deep golden-brown crust and the artful zig-zag of sauces, you bring a professional culinary aesthetic into your home kitchen. We hope you enjoy every crunchy, savory, and creamy bite of this masterpiece.
Did you achieve the perfect drizzle? We want to see your creations! Share your photos and tag us, or leave a comment below with your favorite katsu tips. Don’t forget to save this recipe to your Pinterest boards for your next dinner party!