There is nothing quite like the sight of a white ceramic baking dish emerging from the oven, filled with thick, juicy chicken breasts smothered in a bubbly, golden-brown sauce. This Baked Caesar Chicken is the epitome of comfort food, blending the tangy profile of a classic Caesar salad with the rich, indulgent texture of melted cheese and savory poultry. If you are looking for a meal that looks like it came from a professional kitchen but requires minimal effort, you have found it.
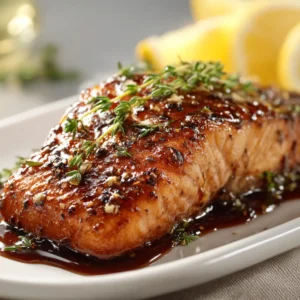
The magic of this dish lies in the contrast between the pale yellow, creamy sauce and the localized areas of deep golden-brown caramelization. Every bite offers a symphony of textures: the snap of coarse black pepper, the freshness of chopped green parsley, and the melt-in-your-mouth tenderness of perfectly cooked chicken. This recipe is designed to be a high-protein staple that satisfies even the pickiest eaters while looking absolutely stunning on your dinner table.

Why This Bubbly Baked Caesar Chicken Is a Game Changer
- Unmatched Texture: We achieve a thick, bubbly, melted topping that features charred cheese bubbles for that authentic “handheld smartphone photo” rustic appeal.
- Juiciness Guaranteed: By coating the thick chicken breasts in a rich Caesar-based sauce, we lock in moisture, preventing the meat from drying out during the baking process.
- Bold Visual Contrast: The vibrant green of the freshly chopped parsley pops against the off-white sauce, while coarse black pepper adds a sophisticated, gritty visual element.
- Effortless Elegance: This recipe delivers a gourmet “creamy sauce” aesthetic with only a handful of high-quality ingredients.
The Science Behind the Perfect Off-White Caesar Sauce
To achieve the exact visual described in our blueprint—a thick, creamy, pale yellow sauce—we cannot rely on bottled dressing alone. We must build a structural base that withstands the high heat of the oven without breaking or becoming greasy.
Thick Chicken Breasts (1.5 lbs / 680g): You want breasts that are at least 1 inch (2.5cm) thick. Thick cuts ensure the center stays succulent while the exterior develops that beautiful golden-brown caramelization.
Creamy Caesar Dressing (1 cup / 240ml): Choose a high-quality, refrigerated Caesar dressing for the best emulsification. This provides the acidic tang and the “off-white” color base.
Full-Fat Sour Cream or Greek Yogurt (1/2 cup / 120ml): This is our secret “invisible” ingredient. It adds stability to the sauce, ensuring it stays thick and creamy rather than melting into a thin liquid.
Shredded Mozzarella Cheese (1.5 cups / 170g): Mozzarella provides the “stretch” and those iconic charred cheese bubbles that look so incredible under soft natural daylight.
Grated Parmesan Cheese (1/2 cup / 45g): Parmesan adds a salty punch and aids in the browning process, helping to create those localized areas of caramelization.
Fresh Parsley (2 tbsp / 8g): Do not use dried parsley here. We need the vibrant green flakes to provide the heavy garnish that defines the final look.
Coarse Black Pepper (1 tsp / 2g): Freshly cracked, coarse pepper creates the “specks” seen in the visual prompt, offering a sharp bite that cuts through the richness of the cheese.
Essential Tools for a Professional Finish
To replicate the eye-level, handheld smartphone photo style, you need the right vessel. A white ceramic baking dish is non-negotiable; it reflects light beautifully and provides the neutral background required for the sauce to shine. You will also need a meat thermometer to ensure the thick chicken breasts reach an internal temperature of 165°F (74°C) without overcooking. A sharp chef’s knife is essential for achieving those finely chopped parsley flakes.

Step-by-Step Guide to the Perfect Charred Cheese Topping
Preparing the Poultry Foundation
Start by patting your thick chicken breasts dry with paper towels. This is a crucial step; any surface moisture will steam the chicken rather than allowing the sauce to adhere. Season very lightly with salt, keeping in mind that the Caesar dressing and Parmesan are already quite salty.
Place the chicken in your white ceramic baking dish. Ensure they are not overlapping, as we want the sauce to coat the tops and sides of each breast completely to achieve that “completely coated” look from the blueprint.
Whisking the Velvety Caesar Coating
In a medium mixing bowl, combine the Caesar dressing, sour cream, and half of the Parmesan cheese. Stir until the mixture is a uniform pale yellow color. If the mixture seems too thin, add another tablespoon of sour cream. We are looking for a heavy, spreadable consistency that won’t simply run off the chicken.
Spread the mixture generously over the chicken. Use a spatula to ensure the coating is thick. This layer acts as an insulator, keeping the chicken “thick and juicy” while the oven’s heat works on the cheese.
Achieving the Golden-Brown Caramelization
Preheat your oven to 375°F (190°C). Sprinkle the shredded mozzarella and the remaining Parmesan over the saucy chicken. Bake for 20-25 minutes. During the last 3 minutes, turn your broiler to high. This is where the magic happens.
Watch closely through the oven window. You are looking for the cheese to transition from melted to “bubbly” with “slightly charred cheese bubbles.” Once you see those localized areas of golden-brown caramelization, remove the dish immediately. The sauce should be glossy and melted, reflecting the light perfectly.
The Final Flourish: Garnish and Texture
While the chicken is resting—which is vital for the juices to redistribute—prepare your garnish. Chop the fresh green parsley until it forms fine flakes. Crack your black pepper on the coarsest setting of your grinder.
Sprinkle the parsley and pepper heavily over the dish. The green flakes should settle into the crevices of the melted cheese, and the black pepper specks should be clearly visible against the off-white sauce, exactly like the visual prompt. Serve immediately while the sauce is still “thick and bubbly.”
Expert Tips for Success
- The Resting Rule: Let the chicken sit for at least 5 minutes before slicing. This prevents the creamy sauce from sliding off and keeps the meat succulent.
- Avoid “Sauce Break”: If your sauce looks oily, it’s likely because the heat was too high or the dressing lacked emulsifiers. Using full-fat sour cream prevents this.
- Visual Cues: If you don’t see “charred bubbles,” your broiler might not be hot enough. Move the rack to the top position for the final minute.
- Cheese Selection: Use freshly shredded mozzarella if possible. Pre-shredded cheese is coated in potato starch, which can prevent those beautiful charred spots from forming.
Smart Storage and Reheating Methods
This Baked Caesar Chicken keeps well in the refrigerator for up to 3 days when stored in an airtight container. To reheat, avoid the microwave if possible, as it can make the chicken rubbery and the sauce oily. Instead, place the chicken back in a ceramic dish, cover with foil, and warm in a 350°F (175°C) oven until heated through.
Freezing is not recommended for this specific recipe, as the creamy Caesar sauce may separate and lose its velvety texture upon thawing. This dish is best enjoyed fresh, when the “glossy, melted texture” is at its peak.
What to Serve With This Creamy Chicken
Because this dish is so rich and decadent, it pairs perfectly with light, acidic, or starch-based sides. For a truly indulgent meal, serve the chicken over a bed of creamy roasted garlic lemon pasta sauce to double down on the garlic profile.
If you prefer a lighter approach, a crisp Italian grinder salad (minus the bread) provides a refreshing crunch that cuts through the heavy cheese topping. For those who love a bit of a fusion twist, serving this alongside crispy pizza chips adds a fun, textural contrast that kids and adults alike will love.
If you are in the mood for more “melt-in-your-mouth” poultry experiences, you might also enjoy our creamy herb chicken or even the tropical notes of Brazilian coconut chicken.
Frequently Asked Questions
Yes, but for the thickest sauce, use a high-quality refrigerated Caesar dressing and mix it with sour cream to prevent it from becoming too thin in the oven.
Yes, boneless skinless chicken thighs work well. Just increase the bake time by about 5-10 minutes to ensure they are fully cooked through.
The secret is a quick 2-3 minute broil at the very end of the cooking process. Watch it closely to ensure it reaches a golden-brown color without burning.
Absolutely! This recipe is naturally low in carbs and high in protein and fat, making it perfect for a ketogenic or low-carb lifestyle.
This usually happens if the chicken wasn’t dried properly before coating or if a low-fat dressing was used. Always use full-fat ingredients for the best emulsification.
The Ultimate Baked Caesar Chicken Recipe Card
Baked Caesar Chicken: The Ultimate Creamy and Bubbly Weeknight Dinner
Ingredients
Equipment
Instructions
- Preheat oven to 375°F (190°C). Pat thick chicken breasts dry and place them in a white ceramic baking dish.
- In a bowl, whisk together 1 cup (240ml) Caesar dressing, 1/2 cup (120ml) sour cream, and half of the Parmesan cheese until a thick, pale yellow sauce forms.
- Spread the Caesar mixture over the chicken breasts. Top with shredded mozzarella and remaining Parmesan. Bake for 20-22 minutes.
- Turn broiler to high and cook for 2-3 minutes until the sauce is bubbly and shows golden-brown charred bubbles.
- Remove from oven and let rest for 5 minutes. Heavily garnish with 2 tbsp (8g) chopped green parsley and 1 tsp (2g) coarse black pepper specks.
Notes
Ensure the chicken is patted dry for the best sauce adhesion.

Bring the Bistro Home with This Creamy Classic
Baked Caesar Chicken is more than just a quick dinner; it is a sensory experience. From the visual appeal of the golden-brown cheese to the aromatic punch of fresh parsley and coarse pepper, it hits every mark for a satisfying meal. Whether you are cooking for a busy family or hosting a casual dinner with friends, this dish promises a “wow” factor with minimal cleanup.
If you loved this recipe, please leave a comment below and let us know how your charred bubbles turned out! Don’t forget to follow us on Pinterest for more visually stunning recipe inspiration and meal prep ideas. Happy cooking!