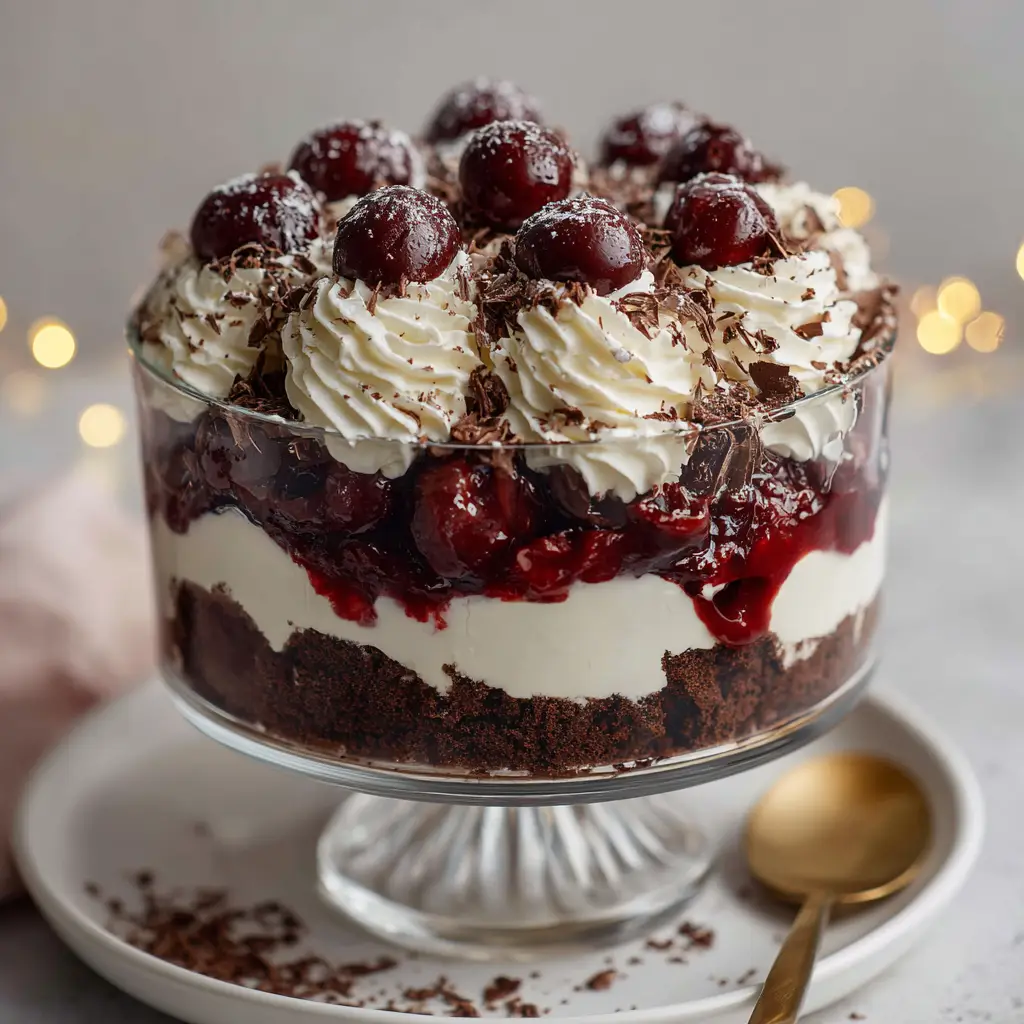
The Black Forest Trifle is more than just a dessert; it is a towering architectural feat of culinary indulgence. Imagine plunging a gold spoon through layers of ethereal whipped cream, glossy cherries, and the deepest, darkest chocolate cake crumbles. This dish captures the timeless elegance of the traditional German cake but transforms it into a contemporary, high-contrast spectacle designed for the center of your table.
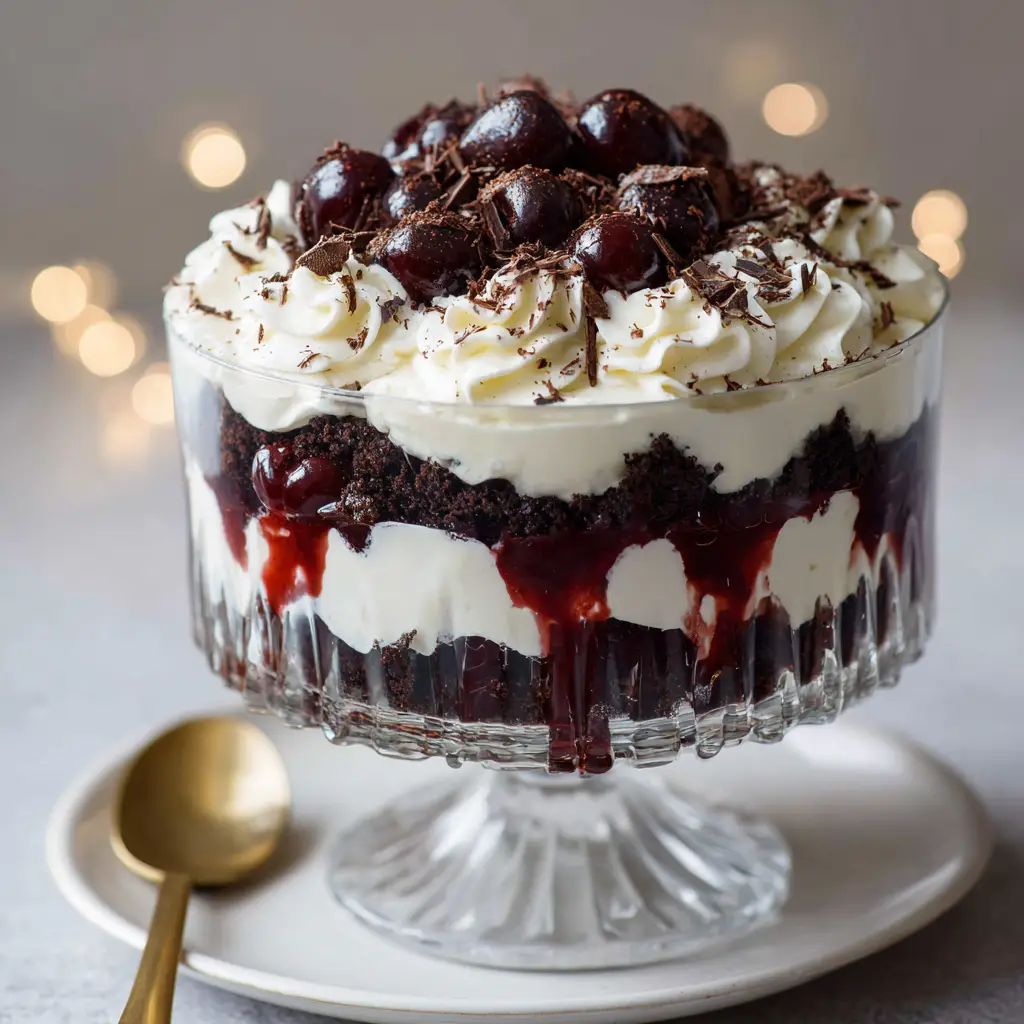
In this version, we focus heavily on the visual and textural interplay described in our forensic blueprint. You will see the thick, glossy red cherry pie filling as it slowly meanders down the side of a clear glass footed trifle bowl, creating those iconic “drips” against the pure white cream. Every spoonful offers a symphony of soft, airy, and slightly chewy textures that keep your guests reaching for “just one more bite.”
Whether you are hosting a festive holiday gathering or a sophisticated summer soirée, this dessert delivers on every promise of decadence. By utilizing specific techniques for stabilizing cream and selecting the right crumb structure for the cake, we ensure your trifle looks as professional as a handheld smartphone photo taken in soft natural daylight, even hours after assembly.
Why This Layered Black Forest Masterpiece Works
- Structural Integrity: By using rough chocolate cake crumbles instead of large cubes, the layers settle naturally without large air gaps, ensuring every bite is perfectly balanced.
- Visual Contrast: The stark juxtaposition between the pure white whipped cream and the deep red of the glossy cherry filling creates a stunning “halo” effect against the dark chocolate.
- Multi-Dimensional Cherry Flavor: We utilize both thick cherry pie filling for texture and whole dark cherries in syrup for that glistening, professional finish.
- Gourmet Texture: The addition of coarse dark chocolate shavings provides a necessary “snap” that contrasts with the softness of the cream and cake.
Essential Elements for a Show-Stopping Black Forest Trifle
To achieve the specific visual results of our blueprint, each ingredient must be selected with both aesthetics and flavor science in mind. We are not just building a dessert; we are engineering a masterpiece of color and light.
Dark Chocolate Cake Crumbles: You will need 6 cups (approx. 600g) of a high-moisture dark chocolate cake. The “rough” texture is key; it absorbs just enough cherry syrup to become fudge-like without losing its structural identity in the bowl.
Pure White Heavy Cream: Use 3 cups (720ml) of heavy whipping cream with at least 36% milk fat. This ensures the piped swirls on top maintain their “stiff peak” definition under the weight of the cherries and shavings.
Confectioners’ Sugar: 1/2 cup (60g) of finely sifted sugar is essential for both sweetness and stability. It contains a small amount of cornstarch, which helps the whipped cream hold its shape for hours without “weeping.”
Glossy Cherry Pie Filling: 2 cans (21 oz / 595g each) of premium cherry pie filling provide the “sauce” element. This is what creates those beautiful red drips down the side of the glass bowl that define the trifle’s side profile.
Whole Dark Cherries in Syrup: 1 jar (approx. 12 oz / 340g) of pitted dark Morello or Amarena cherries. These are used as the final garnish; their glistening, dark skins reflect the natural daylight perfectly for that “unedited” look.
Coarse Dark Chocolate Shavings: 4 oz (115g) of high-quality 70% dark chocolate. Use a vegetable peeler or a sharp knife to create large, irregular curls rather than fine dust to match the “coarse” requirement of our visual prompt.
Pure Vanilla Extract: 1 tbsp (15ml) of high-quality vanilla adds the foundational aromatic layer that bridges the gap between the bitter cocoa and the tart cherries. If you’ve enjoyed our Heaven on Earth Cake, you know how vital the vanilla-cherry-cream harmony is.
The Professional Tool Kit
Achieving the “eye-level shot” aesthetic requires a few specific tools to ensure the layers remain distinct and the presentation stays clean. A messy trifle is delicious, but a forensic trifle is art.
Clear Glass Footed Trifle Bowl: This is non-negotiable for the visual impact. The pedestal elevates the dessert, while the clear glass allows the layering of cake, cream, and cherry drips to be the star of the show.
Large Piping Bag and Star Tip: To get those “piped whipped cream swirls” on the top layer, a simple spoon won’t suffice. Using a large closed-star tip creates the ridges that catch the “soft natural daylight” and create depth in photos.
Offset Spatula: This tool allows you to smooth the cream layers out to the very edge of the glass without smearing the cake crumbs into the white cream, preserving the “thick, distinct layer” look.
Bench Scraper or Sharp Knife: Essential for creating those coarse shavings from a block of chocolate. The goal is variety in size—some large curls, some smaller “chocolate cake crumbs” for the very top.
Constructing the Layers: Step-by-Step Instructions
Step 1: Preparing the Foundation Crumbles
Begin by taking your prepared and cooled dark chocolate cake. Instead of cutting it into uniform cubes, use your hands to break the cake into “rough, dark chocolate cake crumbles.” You want a mix of small bits and larger 1-inch (2.5cm) chunks. This variety in size allows the cake to pack down slightly while still providing a textured, “craggy” appearance through the glass. If you love the texture of our peanut butter cup chocolate roll, you’ll recognize the importance of a moist, chocolatey base here.
Step 2: Whipping the Cream to Peak Perfection
In a chilled metal bowl, combine the heavy cream, confectioners’ sugar, and vanilla. Whip on medium-high speed until stiff peaks form. Listen for the sound of the whisk—it will change from a splashing sound to a dull thud as the cream thickens. You are looking for a “pure white” and “smooth” texture. Set aside about 2 cups (480ml) of this cream in a piping bag fitted with a star tip for the final flourish.
Step 3: The First Layering Sequence
Place half of your rough cake crumbles into the bottom of the trifle bowl. Gently press down so they form an even, dark base. Next, add a “thick, distinct layer” of the whipped cream. Use your offset spatula to push the cream against the glass, ensuring no cake crumbles are visible from the side in this specific section. This creates the sharp color contrast required for the visual blueprint.
Step 4: Creating the Iconic Cherry Drips
Spoon half of the glossy cherry pie filling over the cream. To achieve the “sauce dripping down the sides” look, specifically deposit spoons of the filling right against the edge of the glass. Gravity will do the work, pulling the thick red sauce down into the white cream. This is a sensory cue to watch for—the slow movement of the red syrup against the white backdrop is the hallmark of a professional Black Forest Trifle.
Step 5: Repeating the Architecture
Add the remaining dark chocolate cake crumbles on top of the cherry layer. Follow this with another layer of whipped cream, smoothing it flat. This second layer acts as the stage for your decorative top. It is very similar to the layering process found in a no-bake chocolate eclair cake, where distinct levels are key to the final mouthfeel.
Step 6: The Decorative Grand Finale
Take your piping bag and create “generous piped whipped cream swirls” across the entire top surface. Once piped, artistically arrange the whole, glistening dark cherries in syrup on top. Sprinkle the “heavy sprinkle of coarse, dark chocolate shavings” over the swirls, letting some fall into the crevices. Finally, scatter a few of the “smaller chocolate cake crumbs” across the top to tie the entire visual theme together. Serve on a white plate with a gold spoon resting beside it to match the visual prompt’s styling.
Expert Tips for Visual and Culinary Success
- The Temperature Factor: Ensure your heavy cream is ice-cold before whipping. If the cream is too warm, it won’t hold the stiff peaks necessary for the piped swirls, and your cherries will sink into the “abyss.”
- The “Clean Glass” Rule: As you layer, use a damp paper towel to wipe any stray drips from the upper inside of the glass. This keeps the layers looking sharp and professional for your handheld smartphone photos.
- Syrup Management: When adding the whole cherries from the syrup jar, give them a slight drain but keep them “glistening.” You want them to look wet and fresh, not dry, but you don’t want excess syrup pooling and turning the whipped cream pink.
- Cake Choice: While a boxed mix works, a sourdough chocolate cake or a dense devil’s food cake provides the best “rough crumble.” If you need a gluten-free base, our flourless chocolate torte can be baked and crumbled for an ultra-rich alternative.
Shelf Life and Storage Strategy
The Black Forest Trifle is surprisingly resilient, but it does have a “peak window” for visual perfection. Because of the stabilized whipped cream, the trifle will hold its shape in the refrigerator for up to 24 hours. In fact, many experts suggest that 4-6 hours of “rest” time allows the cake crumbles to soften slightly from the cherry juices, improving the flavor.
Refrigeration: Always keep the trifle chilled. If your kitchen is warm, the whipped cream swirls will lose their crisp edges. Cover the top loosely with plastic wrap, being careful not to crush the piped swirls.
Freezing: We do not recommend freezing a fully assembled trifle. The texture of the cherry pie filling becomes grainy upon thawing, and the whipped cream may separate. However, you can freeze the dark chocolate cake crumbles months in advance.
What to Serve With This Decadent Dessert
Since the Black Forest Trifle is such a rich, heavy dessert, it pairs beautifully with lighter fare or savory contrasts. If you are hosting a full dinner, consider starting with a crisp salad or prosciutto-wrapped mozzarella to wake up the palate before the chocolate onslaught.
For a themed dessert table, this trifle stands out as the centerpiece alongside smaller finger foods. It balances perfectly with the citrus notes of lemon rice krispie treats or the salty-sweet crunch of salted caramel pretzel cheesecake balls. The acidity in the cherries also makes it a great follow-up to a savory main like a caramelized onion tart.
Common Questions About Layered Trifles
Yes, you can assemble the trifle up to 24 hours in advance. In fact, a few hours in the fridge allows the flavors to meld and the cake to soften slightly from the cherry syrup.
Absolutely. A store-bought chocolate pound cake or fudge cake works perfectly. Just ensure you break it into rough, irregular crumbles rather than neat cubes for the best visual texture.
Traditional Black Forest recipes use Kirsch (cherry brandy). While this version focuses on family-friendly cherry pie filling, you can certainly brush the cake crumbles with 2 tablespoons of Kirsch for an authentic flavor profile.
Use heavy whipping cream with high fat content and stabilize it with confectioners’ sugar. Keep the trifle refrigerated until the moment of serving, especially in warm environments.
Use a spoon to deposit the cherry pie filling directly against the glass wall of the bowl rather than in the center. Gravity will naturally pull the thick sauce downward over the white cream.
The Complete Black Forest Trifle Recipe
Black Forest Trifle: The Ultimate Layered Dark Chocolate and Cherry Masterpiece
Ingredients
Equipment
Instructions
- Break the dark chocolate cake into rough, irregular crumbles using your hands. Aim for a mix of small crumbs and 1-inch chunks.
- In a chilled bowl, whisk heavy cream, sugar, and vanilla until smooth, stiff peaks form. Transfer 2 cups to a piping bag.
- Add half the cake crumbles to the trifle bowl. Layer half the whipped cream over the cake, smoothing it to the edges of the glass.
- Spoon half the cherry pie filling over the cream, pushing some to the edges to create visible red drips down the side.
- Repeat with remaining cake and cream layers. Pipe decorative swirls on top using the piping bag.
- Top with glistening whole cherries, coarse chocolate shavings, and a few fine cake crumbs. Serve on a white plate with a gold spoon.
Notes
Wipe the inside of the glass between layers for a professional, clean look.
Conclusion: Capture the Glow
Bringing this Black Forest Trifle to the table is a guaranteed “wow” moment. The contrast of the rough dark cake against the pure white cream and the glistening red cherries creates a visual harmony that is just as satisfying as the taste itself. This recipe bridges the gap between classic German tradition and modern aesthetic presentation.
We invite you to try this at your next gathering and share your results! Don’t forget to take a photo in that soft natural daylight and tag us. For more visually stunning recipes and daily meal inspiration, be sure to follow DaisyMeals on Pinterest. Happy layering!