Indulge in the ultimate decadent dessert with this foolproof chocolate crepe recipe. We’re making incredibly rich, delicate, and tender crepes from scratch, infused with a deep cocoa flavor in every single bite. Forget complicated techniques; this recipe is surprisingly simple and yields perfectly thin, lacy crepes that taste like they came straight from a Parisian café. Whether you’re planning a special breakfast, a romantic dessert, or just satisfying a chocolate craving, this guide will make you a crepe-making expert.
These aren’t just regular crepes filled with chocolate; the chocolate is baked right into the batter, creating a sophisticated flavor that pairs beautifully with countless fillings. Let’s dive in and create something truly special!
Why You’ll Love This Chocolate Crepe Recipe
- Incredibly Rich Flavor: Using high-quality unsweetened cocoa powder infuses the batter with a deep, authentic chocolate taste that isn’t overly sweet.
- Foolproof Batter: We share two simple methods—classic whisk and a quick blender technique—to guarantee a silky smooth, lump-free batter every time.
- Perfectly Tender Texture: The secret is resting the batter! This simple step results in delicate, pliable crepes with beautiful lacy edges.
- Versatile & Elegant: Dress them up or down! They are perfect for a fancy dessert with berries and cream or a simple afternoon treat with a dusting of powdered sugar.
Key Ingredients for Perfect Chocolate Crepes
The magic of this recipe lies in its simple, high-quality ingredients. Each one plays a crucial role in creating that perfect texture and flavor.

- All-Purpose Flour: Provides the structure for our delicate crepes.
- Unsweetened Cocoa Powder: The star of the show! Use a good quality brand for the best, richest chocolate flavor. Dutch-processed cocoa will give a darker color and smoother flavor.
- Granulated Sugar: Adds just a touch of sweetness to balance the bitterness of the cocoa.
- Salt: A pinch of salt is essential for enhancing all the other flavors, especially the chocolate.
- Eggs: They bind the batter together and add richness and tenderness.
- Milk: Whole milk provides the best flavor and creamy texture, but 2% works well too.
- Melted Butter: Adding melted butter directly to the batter makes the crepes rich, tender, and less likely to stick to the pan.
- Vanilla Extract: Complements the chocolate flavor beautifully.
How to Make Chocolate Crepes: Two Ways to a Perfect Batter
A perfectly smooth batter is non-negotiable for thin, delicate crepes. Lumps are the enemy! Here are two easy, reliable methods to achieve a silky consistency.
Method 1: The Classic Whisk Method
- Combine Dry Ingredients: In a large mixing bowl, whisk together the flour, cocoa powder, sugar, and salt. Breaking up any cocoa lumps now is key.
- Whisk in Wet Ingredients: Create a well in the center of your dry ingredients. Add the eggs and vanilla, and whisk until just combined. Slowly pour in about half of the milk while whisking continuously, incorporating the flour from the sides of the bowl to form a thick, smooth paste.
- Finish the Batter: Once the paste is smooth, gradually whisk in the remaining milk until fully combined. Finally, whisk in the melted butter. The batter should have the consistency of heavy cream.
Method 2: The Foolproof Blender Method
For the absolute easiest and quickest way to a lump-free batter, a blender is your best friend. It’s a fantastic shortcut that guarantees perfect results. For more tips, check out our 5-Minute Blender Crepe Recipe (coming soon).
- Load the Blender: Add all the wet ingredients to the blender first (milk, eggs, melted butter, vanilla). Then, add the dry ingredients (flour, cocoa powder, sugar, salt) on top.
- Blend Until Smooth: Secure the lid and blend on medium-high speed for 30-45 seconds, or until the batter is completely smooth. Scrape down the sides if needed and give it one final pulse.
The Secret to Delicate Crepes: Let the Batter Rest!
This is the most important step and the one people often skip! No matter which method you used, you must let the batter rest. Cover the bowl (or leave it in the blender) and refrigerate for at least 30 minutes, or up to 48 hours. This allows the flour to fully absorb the liquid and lets the gluten relax, resulting in much more tender, delicate crepes that won’t tear easily.
Cooking Your Crepes to Perfection
Once your batter has rested, it’s time to cook. Give the batter a gentle stir, as the cocoa may have settled.
- Heat the Pan: Place an 8-inch non-stick skillet or crepe pan over medium heat. Add a tiny bit of butter and swirl to coat the pan lightly. The pan is ready when a drop of water sizzles and evaporates quickly.
- Pour the Batter: Pour about 1/4 cup of batter into the center of the hot pan. Immediately lift the pan off the heat and tilt and swirl it in a circular motion to spread the batter into a thin, even layer.
- Cook the First Side: Return the pan to the heat and cook for about 60-90 seconds. You’ll know it’s ready to flip when the edges start to look dry and lift away from the pan, and the surface appears matte, not shiny.
- Flip and Finish: Gently loosen the edges with a thin spatula. You can flip it with the spatula or be bold and use your fingertips. Cook the second side for another 30-45 seconds. It doesn’t need to brown much.
- Stack and Repeat: Slide the finished crepe onto a plate. Repeat the process with the remaining batter, adding a tiny bit more butter to the pan every few crepes as needed. Stack the cooked crepes on top of each other; this keeps them warm and soft.

Delicious Filling & Topping Ideas
The rich cocoa flavor of these crepes is a perfect canvas for so many delicious fillings. Here are a few of our favorites:
- Classic Nutella: You can never go wrong with a simple spread of chocolate-hazelnut goodness. Explore our Ultimate Nutella Crepe Recipe (coming soon) for more ideas.
- Strawberries and Cream: A truly elegant pairing. Fill with freshly whipped cream and sliced strawberries for a stunning dessert. Learn how to make the perfect version with our Fresh Strawberry Crepes Recipe (coming soon).
- Banana & Caramel: Sliced bananas with a drizzle of salted caramel sauce and a sprinkle of toasted pecans.
- Cream Cheese Filling: A sweet and tangy filling made from cream cheese, powdered sugar, and a hint of lemon zest.
- Simple Dusting: Sometimes, a simple dusting of powdered sugar is all you need to let the chocolate flavor shine.
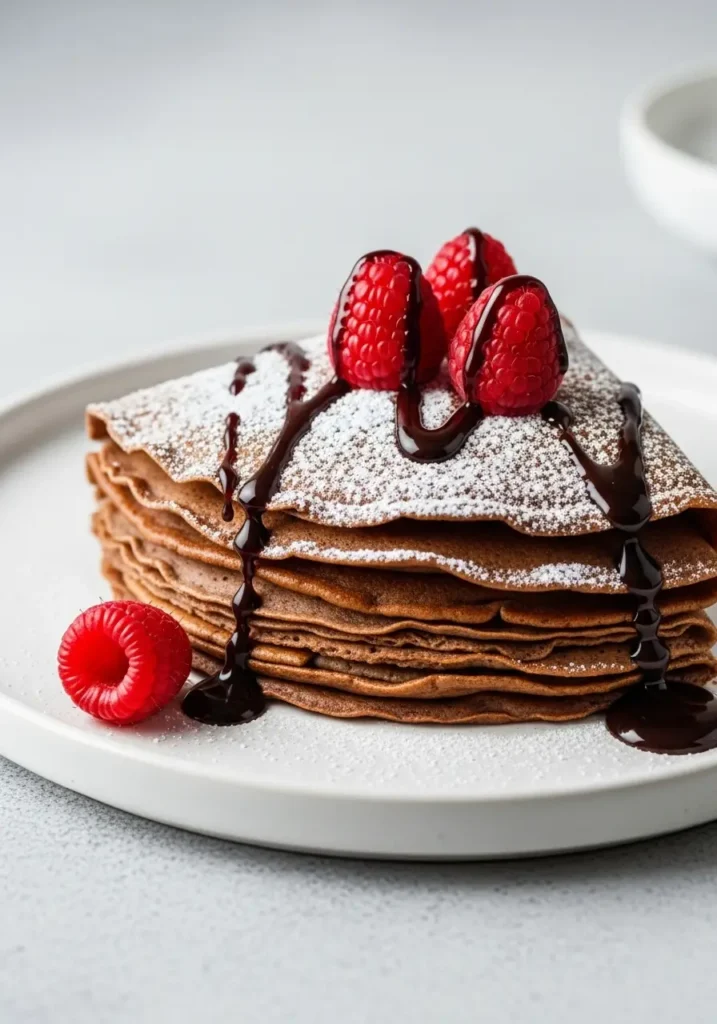
- Chocolate Ganache & Raspberries: For the ultimate chocolate lover, fill with a rich, dark chocolate ganache and tart fresh raspberries.
Tips for Success: Avoid Common Crepe Mistakes
- Don’t Skip the Rest: We can’t say it enough! Resting the batter is crucial for a tender, non-rubbery crepe.
- Control Your Heat: A pan that is too hot will cook the crepe before you can spread the batter thinly. Too cool, and it won’t get those lovely lacy edges. Medium heat is your sweet spot.
- Less is More: Use just enough batter to create a thin coating on the pan. Thick crepes will be heavy rather than delicate.
- Be Patient Before Flipping: Wait until the edges are clearly pulling away and the surface is dry. Flipping too early is the number one cause of torn crepes.
Make-Ahead, Storage, and Freezing Instructions
Storing the Batter
The crepe batter can be made ahead and stored in an airtight container in the refrigerator for up to 2 days. Give it a quick stir before using.
Storing Cooked Crepes
Stack the cooled crepes with a small piece of parchment or wax paper between each one to prevent sticking. Wrap the stack tightly in plastic wrap or place in an airtight container. They will keep in the refrigerator for up to 3 days.
How to Freeze Crepes
Crepes freeze beautifully! Stack the cooled crepes with parchment paper in between each one. Place the stack in a freezer-safe zip-top bag and freeze for up to 2 months. To thaw, leave them in the refrigerator overnight or on the counter for about an hour. Reheat gently in a warm, non-stick pan.

Chocolate Crepe Recipe (Rich, Foolproof & Easy!)
Ingredients
Equipment
Instructions
- In a large bowl, whisk together the flour, cocoa powder, sugar, and salt. If using the blender method, add wet ingredients to the blender first, then dry ingredients.
- For the whisk method, make a well in the center and add eggs and vanilla. Whisk while slowly adding about half the milk to form a smooth paste. Then, whisk in the remaining milk and melted butter until smooth.
- If using a blender, blend all ingredients on high for 30-45 seconds until completely smooth. Scrape down the sides and pulse once more.
- Cover the batter and refrigerate for at least 30 minutes (or up to 48 hours). This step is crucial for tender crepes.
- Heat an 8-inch non-stick skillet over medium heat. Lightly grease with butter.
- Stir the rested batter. Pour about 1/4 cup of batter into the hot pan, then immediately lift and swirl the pan to spread the batter into a thin, even circle.
- Cook for 60-90 seconds, until the edges are dry and lifting and the surface is matte. Gently loosen the edges and flip. Cook the other side for another 30-45 seconds.
- Slide the cooked crepe onto a plate. Repeat with the remaining batter, stacking the crepes as you go to keep them warm.
Notes
Batter Consistency: The batter should be the consistency of heavy cream. If it seems too thick after resting, you can whisk in another tablespoon of milk.
Filling: Fill and fold the crepes while they are still warm for the best results.
Frequently Asked Questions About Chocolate Crepe Recipe
The key is patience! Make sure the crepe is fully cooked on the first side before attempting to flip. The edges should be dry and pulling away from the pan, and the surface should look matte. A thin, flexible spatula will also make flipping much easier.
To store, let the crepes cool completely, then stack them with a piece of parchment or wax paper between each one. Wrap the stack tightly and refrigerate for up to 3 days or freeze for up to 2 months. To reheat, gently warm them one at a time in a non-stick skillet over low heat.
An 8 to 10-inch non-stick skillet or a dedicated crepe pan is best. The non-stick surface is key to preventing sticking and tearing, allowing you to use minimal butter for cooking.
Rubbery crepes are usually caused by two things: overmixing the batter, which develops too much gluten, or not letting the batter rest. Resting for at least 30 minutes is crucial for allowing the gluten to relax, resulting in a much more tender crepe.
Enjoy Your Homemade Chocolate Crepes!
There’s nothing quite like a warm, freshly made chocolate crepe. We hope you love this rich and decadent chocolate crepe recipe as much as we do. It’s a wonderfully rewarding recipe that’s sure to impress anyone you share it with.
If you try this recipe, please leave a comment below to let us know how it turned out! And don’t forget to follow us on Pinterest for more delicious inspiration.